This article will show you how to setup your email on your iPad or iPhone using a Fairpoint.net email address.
Setting up your email account on your iPad and iPhone is relatively straight forward if you’re using a major email service like, iCloud, Microsoft Exchange, Gmail, Yahoo, AOL or Hotmail. To set it up, go to Settings >Mail, Contacts Calendars > Add Account… > fill in name, email & password > Next > Save. Done!
But what if you want your Fairpoint.net email address on your iPad or iPhone? Follow the instructions below to learn how.
 If you’re looking to figure this out, you’ve come to the right spot. Fairpoint lists the instructions on their website here though they didn’t work for me. You can give it a try and see if they work for you. I ended up writing this post because I was thinking that there are other people out there who are having the same problem and end up just getting frustrated in not figuring out how to do it.
- 1. Settings >
- 2. Mail, Contacts, Calendars >
- 3. Add Account >
- 4. Other >
- 5. Add Mail Account
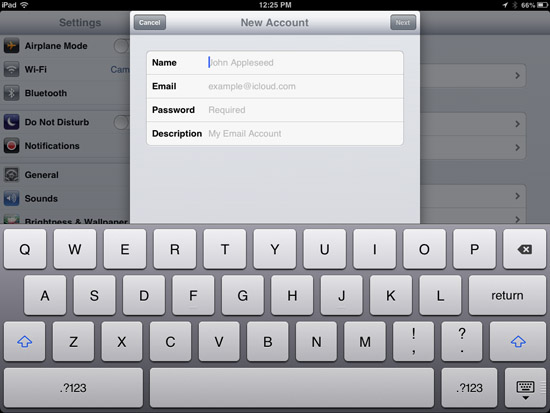
- 6. Once you’re here, fill in your Name, Email, Password & Description (Description will automatically add your email address).
- 7. Save >
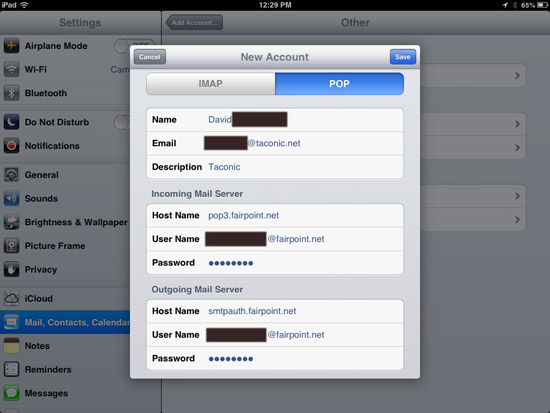
- 8. Select the POP tab
- 9. Incoming Mail Server (make sure all this information is filled in)
- Host Name: pop3.fairpoint.net
- User Name: (your fairpoint.net email address)
- Password: (same password as your email, should be auto filled)
- 10. Outgoing Mail Server (make sure all this information is filled in)
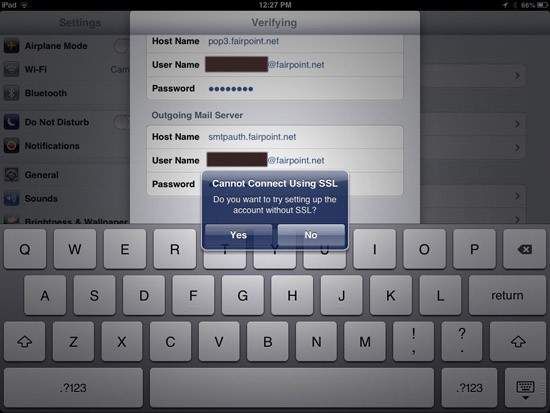
- 11. A pop up window will say “Cannot Connect Using SSL Do you want to try setting up the account without SSL? Press Yes – It will say “Verifying” in the top of the window. Be patient, it should only take a minute or two.
- 12. Another pop up window will appear and say “Cannot Connect Using SSL Do you want to try setting up the account without SSL? Press Yes – All the boxes will have checks next to them automatically and it will take you to the Mail, Contacts, Calendars section.
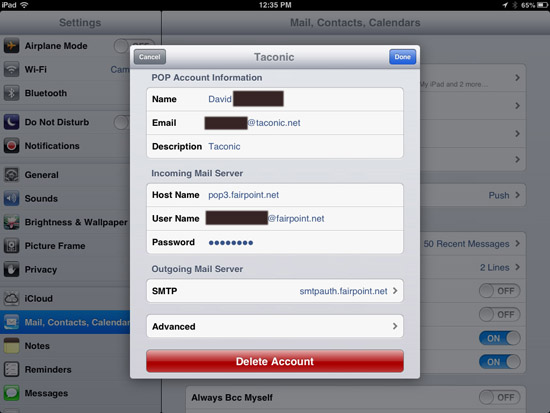
- 13. In the Mail, Contacts, Calendars section, tap the email address you just set up.

- 14. Scroll down and tap Advanced
- Use SSL should be OFF
- Server Port should be 110
- 15. Tap the back arrow in the top left corner of the pop up box
- 16. Tap the Outgoing Mail Server marked SMTP
- Tap the Primary Server that says smtpauth.fairpoint.net
- Use SSL should be OFF
- Tap the Primary Server that says smtpauth.fairpoint.net
- 17. Tap the Done button in the top right corner of the pop up box
- 18. Tap the back arrow in the top left corner of the pop up box
- 19. Tap the Done button again in the top right corner of the pop up box

- 20. Press the main button on your iPad or iPhone to get back to your main screen
- 21. Open the Mail app on your iPad or iPhone
- 22. Done! You should see your mail box active and updating your email.
If you’re still having trouble setting this up, please leave a comment below, on the Facebook page www.facebook.com/ITechcoaching or write me directly at the CONTACT page.
If you found this helpful, signup for more FREE tips on how to get the most out of your iPhone, iPad, Mac and social media experience.


Thanks for this as corporate site is unhelpful. Still struggling … Wondering if any details differ for my address @myfairpoint.net (vs @fairpoint.net)? Thanks.
Thanks, Mike. Not that I’m aware of. Are you having a specific problem?